FDA Industry Systems User Guide: Subaccount Management
Back to FDA Industry Systems Account Management Guide
Creating a Subaccount is optional. If additional personnel are desired to help manage registrations or other submissions, an Account holder may create Subaccounts for them as necessary. Subaccounts differ from Accounts in the amount of information available to each type of account. An Account holder acts as the administrator for a group of Subaccounts for your company. The Account holder can create Subaccounts, update account information for any of his accounts, deactivate accounts that are no longer required, and reactivate accounts as needed.
Subaccount holders* are fully able to make submissions to FDA but are only allowed to change their secret question and answer and account password in Account Management.
*Systems Recognition subaccount holders cannot make submissions to FDA and cannot be promoted to Accounts.
On the FDA Industry Systems home page, choose "Create a Subaccount" from the Account Management Menu.
NOTE: The use of names, companies, cities, and countries are used fictitiously for the purpose of illustrating examples of how to complete the screens. Any resemblance to actual persons, living or dead, business establishments, events, or locales is entirely coincidental
Create a Subaccount - Step 1
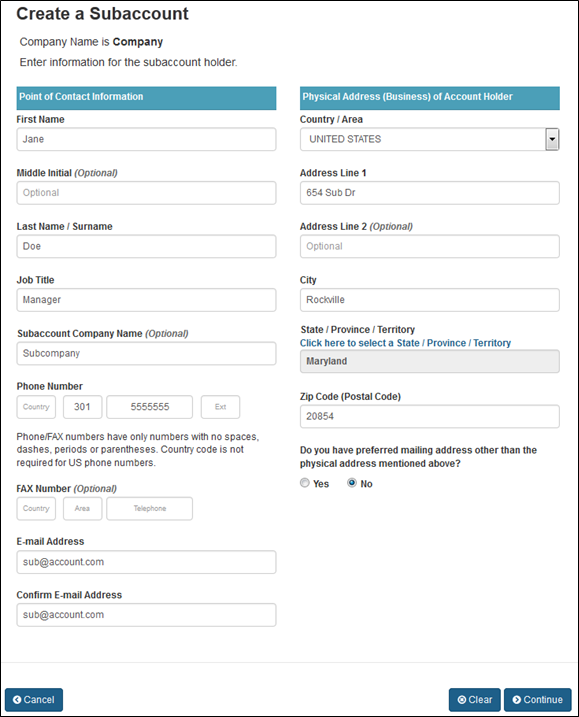
Enter the information for the person in charge of the Subaccount: (see Figure 1).
To create the Subaccount do the following:
- Enter the account information.
- Select Continue.
Fields Included in this Section
| First Name | The first name of the person who will manage this account. |
|---|---|
| Middle Initial | The first initial of the middle name (if applicable) of the person who will manage this account. |
| Last Name / Surname | The last name of the person who will manage this account. |
| Title | The professional title of the person who will manage this account; for example, President, CEO, or Plant Manager. |
| Phone Number: Country Code | For foreign addresses, the three-digit country code of the telephone number of the account holder. |
| Phone Number: Area/City Code | The three-digit area code (for domestic addresses) or city code (for foreign addresses) of the telephone number of the account holder. |
| Phone Number: Phone Number | The telephone number for the account holder. |
| Phone Number: Extension | The telephone extension, if any, dialed after the telephone number, for the account holder. |
| FAX Number: Country Code | For foreign addresses, the three-digit country code of the telephone number of the FAX machine of the account holder. |
| FAX Number: Area/City Code | The three-digit area code (for domestic addresses) or city code (for foreign addresses) of the telephone number of the FAX machine of the account holder. |
| FAX Number: FAX Number | The telephone number of the FAX machine of the account holder. |
| E-mail Address | The account holder's internet electronic mail address. |
| Confirm E-mail | The internet electronic mail address must be entered a second time for verification. |
Physical Address (Business) of Account Holder
| Country/Area | The country/area in which the account holder is located. |
|---|---|
| Address Line 1 | The address of the physical location where the account holder is located. This may be different from the mailing address. |
| Address Line 2 | Continuation of the address of the physical location where the account holder is located. This may be different from the mailing address. |
| City | The city in which the account holder is located. |
| State / Province / Territory | For domestic addresses the state in which the account holder is located. A state or a Province / Territory is required. For foreign addresses, the province, or territory in which the account holder is located. Select the link to choose a Province or Territory from a list for the Country/Area selected. A state or a Province / Territory is required. |
| Zip Code (Postal Code) | The Zip Code (domestic) or Postal Code (foreign) in which the account holder is located. |
Preferred Mailing Address for Issues Regarding this Account (if different)
| Country/Area | The country/area in which the account holder receives mail. |
|---|---|
| Address / P.O. Box Line 1 | The address at which the account holder receives mail. |
| Address Line 2 | Continuation of the address at which the account holder receives mail. |
| City | The city in which the account holder receives mail. |
| State / Province / Territory | For domestic addresses, the state in which the account holder receives mail. A state or a Province / Territory is required. For foreign addresses, the province, or territory in which the account holder receives mail. Select the link to choose a Province or Territory from a list for the Country/Area selected. A state or a Province / Territory is required. |
| Zip Code (Postal Code) | The Zip Code (domestic) or Postal Code (foreign) in which the account holder receives mail. |
Figure 1:
Create a Subaccount - Step 2
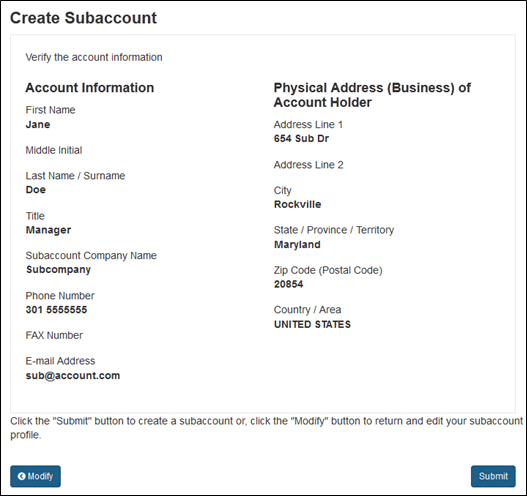
Review the information that you have entered for this Subaccount (see Figure 2).
If you are satisfied that the information is correct, select Submit. If you need to make further changes, select Modify to return to the Create a Subaccount screen and make further edits.
Note: Warning: This address could not be validated, means that the system was unable to verify the address(es) you entered. You are advised to check the address(es). If they are correct, disregard the notice and submit the application. The application will be processed normally.
Figure 2:
Create a Subaccount - Step 3
The status of your request to create a Subaccount is displayed (see Figure 3). The system will generate the following message: The Subaccount was successfully created. The account ID is...
If an e-mail address was provided, the account ID and password will be sent to the e-mail address for the account holder. Click the continue button to return to the FDA Industry Systems home page.
Figure 3:
On the FDA Industry Systems home page, choose "Deactivate a Subaccount" from the Account Management Menu.
NOTE: The use of names, companies, cities, and countries are used fictitiously for the purpose of illustrating examples of how to complete the screens. Any resemblance to actual persons, living or dead, business establishments, events, or locales is entirely coincidental.
Deactivate a Subaccount - Step 1
Change the status of a Subaccount from Active to Inactive. Accounts are deactivated for one of the following reasons:
- The company associated with this account is going out of business.
- The contact person for this account is no longer with the company associated with this account.
- The account is no longer needed for a reason other than those reasons listed above.
To deactivate an account do the following:
- Select one or more accounts from those listed on the screen (see Figure 4).
- For each of the selected accounts, choose a reason under the Reason for Account Deactivation drop-down list.
- Select Continue.
Fields Included in this Section
| Subaccount| xxxxxxxx | A system-generated identification code that enables you to login to FIS. |
|---|---|
| Reason for account deactivation | The reason that the account will no longer be active. |
Figure 4:
Deactivate a Subaccount - Step 2
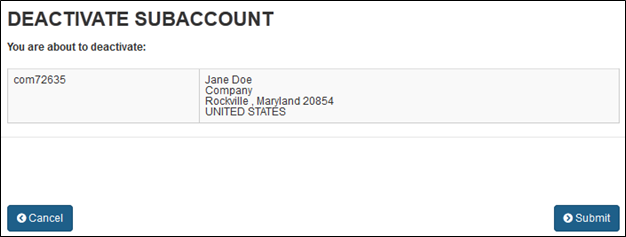
Confirm deletion of the selected Subaccount(s) (see Figure 5).
To confirm deletion, do the following:
- Review the list of accounts you selected.
- If you are satisfied with your selections, select Submit. If you are not satisfied, use the Back button on your browser to return to the Deactivate a Subaccount screen and make further edits. Select Cancel to cancel the account deactivation and return to the FDA Industry Systems home page.
Figure 5:
Deactivate a Subaccount - Step 3
The status of your request to deactivate one or more Subaccounts is displayed. When the process is complete, the system will display the following message: The subaccount was successfully deactivated.
The account can be reactivated using the Reactivate a Subaccount process. Click the continue button to return to the FDA Industry Systems home page.
On the FDA Industry Systems home page, choose "Reactivate a Subaccount" from the Account Management Menu.
NOTE: The use of names, companies, cities, and countries are used fictitiously for the purpose of illustrating examples of how to complete the screens. Any resemblance to actual persons, living or dead, business establishments, events, or locales is entirely coincidental
Reactivate a Subaccount - Step 1
Select the deactivated account(s) that you want to reactivate.
To select one or more accounts, do the following:
- Select the checkbox beside the account(s) to be reactivated (see Figure 6).
- Select Continue.
Note: Account holders cannot reactivate Subaccounts that were deactivated by FDA. If you want to reactivate an account that was deactivated by FDA, please contact the FDA Industry Systems Help Desk.
Figure 6:
Reactivate a Subaccount - Step 2
Confirm reactivation of the selected Subaccounts.
To confirm reactivation:
- Review the list of accounts you selected.
- If you are satisfied with your selections, select Submit. If you want to change the accounts selected, use the Back button on your browser to return to the Reactivate a Subaccount screen and make further edits. Select Cancel to cancel the reactivation and return to the FDA Industry Systems home page.
Reactivate a Subaccount - Step 3
The status of your Reactivate Subaccount request is displayed. When the process is complete, the system will display the following message: You have successfully reactivated the account(s).
A new password for the reactivated Subaccount is sent to the Subaccount holder via e-mail. Click the continue button to return to the FDA Industry Systems home page.


