

MPM: IV. Special Techniques
Macroanalytical Procedures Manual (MPM) Main Page
This chapter highlights some special techniques which are useful in carrying out the macroanalytical procedures contained in Chapter V. Four techniques are described in this chapter; these are as follows:
- X-Ray Radiography
- Determination of the Direction of Insect Penetration of Food Packaging
- Microscopic Confirmation of Decomposition and Rot
- Detection and Recovery of Live Insects
(1) X-Ray Radiography (IV-1)
X-ray radiography provides a permanent, visible film record of the internal condition of a product. It is especially useful for the rapid examination of relatively large samples of cereal grains, coffee beans, spice seeds, legumes (pulses), and other food seeds to determine the percent of individual seeds in a lot which are insect-damaged.
-
Introduction -- The very short wavelength of X-rays (as compared to visible light) enables them to penetrate materials which absorb or reflect ordinary light. X-rays pass readily through most objects, although some of the radiation is absorbed. The amount of absorption depends on the density of the material and its thickness as well as the voltage applied to generate the X-rays. For example, more radiation will pass through the areas of a seed containing hollow portions caused by insect tunneling than through the surrounding areas since the insect tunneling reduces the total thickness of the exposed material.
In addition, the voltage applied to the X-ray tube used to generate the X-rays will affect the penetrating power of the X-rays. High voltages are required to generate adequate penetration through very dense material. Adjustment of the voltage to the specific material is important because it affects the contrast of the image recorded on X-ray-sensitive film after exposure. If the voltage is too high, too much of the radiation will pass through the exposed material and obscure differences in thickness within the material. Similarly, contrast will be poor if the voltage is too low since too little radiation will pass through the material to form a usable image. In the X-ray examination of food material for insect infestation, it is essential to adjust the voltage for maximum contrast to facilitate identification of insect tunneling or other damage.
A radiograph is the representation or image of the exposed material made by placing X-ray sensitive film in the path of the radiation emerging from the exposed material. In this shadow-like picture, the darker areas represent the most penetrable parts of the object while the lighter areas represent the more opaque.
-
X-Ray Equipment and Radiographic Film -- Commercially available X-ray equipment may be classified according to voltage rating. As noted above, voltage is an important factor in controlling contrast. For most grains, legumes, and similar food seeds, it is customary to use an X-ray machine which produces X-rays in the range of about 20 kilovolts (KV) and 5 milliamperes (mA). However, in some cases it will be necessary to have X-rays of higher energy, up to 50 KV. It should be possible to vary the voltage between 15 and 50 KV; the current should be variable between 0 and 20 mA. If the radiograph lacks contrast, the voltage should be fine-tuned. In exceptional cases, changing development time or changing to film of higher contrast may be necessary.
General Electric and Westinghouse both manufacture X-ray equipment well suited to the examination of grain and other food seeds. Two satisfactory radiographic films are DuPont 510 and Eastman M; both have about the same sensitivity.
-
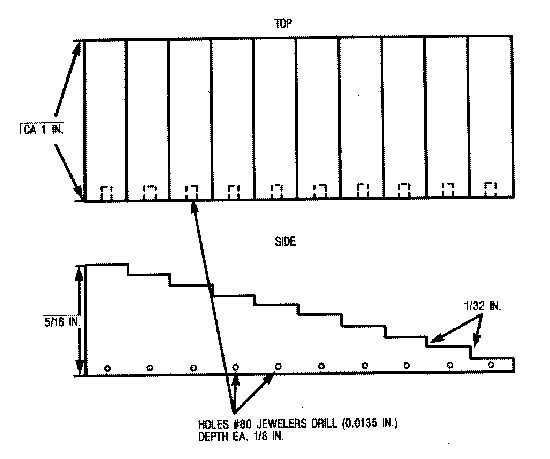
Step-Wedge for X-Ray Standardization
Figure IV-1
Step-Wedge for X-ray Standarization
-- The step-wedge is a tool which is useful in setting exposure levels for radiographs (see Figure IV-1). It consists of a "step tablet" of X-ray micarta 5/16 in. thick and 1 in. wide. The top of the wedge is milled into ten 1/32-in. steps. On the side of each step, a hole (1/32 in. in diameter and 1/8 in. deep) has been drilled. (This is the size of the smallest commonly encountered jeweler's drill.) Differences in thickness due to the steps and the holes will show on the radiograph. At the proper exposure the radiograph should reveal the steps on the wedge without obscuring the holes.
- Exposure and Interpretation -- Expose the standard wedge with the material to be X-rayed. To develop, follow the instructions for the film and the developer used. Table IV-1 lists suggested exposures for a number of food items.
Table IV-1 Recommended Exposure Conditions for X-ray Examination of Various Foods Product voltage(KV) Amperage(mA) Exposure Time (Sec) Coffee 17 5 60 Wheat 17 5 36-40 Allspice 17 5 60 Cardamon 17 10 60 Coriander 17 5 42 Molle seed 17 5 60 Peas (black-eyed) 17 5 90 Chick peas 17 10 60 Hairy vetch 17 5 36-40 NOTE: These figures are based on use of a Westinghouse Machine at 7-min development with DuPont liquid X-ray developer on Eastman M Film.
An important part of radiograph interpretation is the analyst's ability to discriminate between shadows typical of normal seed structure and shadows produced by insect damage. The importance of this cannot be overemphasized, since normal seeds are not uniform in density. Undamaged seeds produce shadows that may superficially resemble insect or other damage. To gain experience in making this discrimination, the analyst may find it helpful to dissect the seeds under low magnification (approximately 10X). The dissected seeds may then be compared kernel by kernel, with the corresponding radiographs. - Safety Standards -- Safety standards have been established by the American National Standards Institute, Subcommittee N 43-5. See the 1975 General Safety Standard for Installation Using Non-Medical X-Ray and Sealed Gamma Ray Sources, Energies up to MeV in the National Bureau of Standards Handbook 114, U.S. Department of Commerce, Washington, DC. These standards should be followed wherever this special technique is used.
(2) Determination of the Direction of Insect Penetration of Food Packaging
Determination of the direction of insect boring into food containers is an important factor for ascertaining when and where a product became contaminated with insects (for example, see the method for Bakery Products, Cooked Cereals, and Alimentary Pastes, Chapter V, Section 2.A.). Insect infestation of foods may occur before or during processing, while in storage, during transit, or on the dealer's shelf. If there are no holes or tears in the package and all seams are adequately sealed, it is apparent that the infestation originated before or during processing. When insect-bored holes are present in the packaging, the source of the infestation is more difficult to determine. However, if the direction in which the holes were bored can be determined, the origin of the infestation may be ascertained. For example, if the hole in the package indicates that insects egressed, then the infestation very probably occurred before packaging. If the hole indicates entry into the container, then the infestation must have occurred after packaging.
AOAC 973.63 describes the macroscopic characteristics of entrance and exit holes caused by common stored-product insects in various types of packaging materials as seen with a wide-field stereoscopic microscope at low power magnification (10-20X). Consult this reference for a full discussion of this subject.
(3) Microscopic Confirmation of Decomposition and Rot Due to Molds (IV-4)
Diseases of fruits, vegetables, and other food crops caused by field or storage fungi may result in a variety of defects including rot, wilt, leaf spots, and gall. These defects are sometimes difficult to distinguish from minor, non-pathogenic physiological defects such as blemishes or shriveling. Since these non-pathogenic defects are quality factors that do not fall within the statutory prohibition of a "decomposed substance," the analyst may need to confirm suspected decomposition by microscopic examination.
-
Defects -- Pathological effects of fungi or molds on plant tissues vary widely, ranging from slight physiological disturbances to those which cause a substantial degree of cellular changes, including hypertrophy, hyperplasia, hypoplasia, cell separation and necrosis. Some fungi invade the intercellular spaces of the host tissue; others grow only on the outer surface. Fungi which produce necrosis of plant tissue usually affect the tissue before the mycelium or mold hyphae are evident. Secretions of some of these fungi kill the cells before the mycelium actually makes contact with them, while other fungi may invade the intercellular spaces before their products kill the cells.
Many symptoms of mold attack that are clearly apparent in fresh food are masked when the food is processed by canning, freezing, or drying. Therefore, macroscopic examination of the processed food may not be sufficient to permit the analyst to determine the presence of mold. Microscopic examination is especially important in those methods where the analyst must characterize the defects in terms of size and appearance.
- Method for Microscopic Confirmation of Mold -- Prepare a slide of tissues from the affected portion of the food material. The tissue should be sufficiently thin so that the elements of the host tissue and any invading fungal hyphae can be clearly seen under the microscope. Dry foods such as coffee beans, nuts, or spices usually require softening of the tissues by rehydration. Prepare a suitable mount of these materials for microscopic examination by thin-sectioning with a razor blade or other expedient cutting device. Other tissues may be teased apart to prepare a suitable mount. Specimens should be mounted in a suitable clearing agent such as Hertwig's solution (see Chapter III, Reagents). Select tissues for examination from different parts of the affected area. Knowledge of the various species responsible for decomposition in a particular product and their growth characteristics in the host food will also aid in detecting their presence. Knowledge of the normal cell structure of the host tissues will aid in interpreting the microscopic observations. To facilitate interpretation, the analyst may find it useful to prepare slides of normal tissues of the food material for comparison.
(4) Detection and Recovery of Live Insects (IV-4)
The Berlese funnel is a simple device for extracting live insects and mites from plant products and other materials. The basic funnel consists of a heat source (usually a 20-60 watt incandescent bulb or lamp with a reflector) placed above, and directed at, a sieve nested inside a smooth funnel. The stem of the funnel opens into a vial or beaker containing a preservative liquid (see Chapter III, Reagents) whose surface level is in. to 1 in. below the stem opening. The product or material is placed on the sieve and the heat source is positioned progressively closer to the product, gradually forcing the insects and/or mites downward through the product, into the funnel and eventually into the preservative. Use the largest mesh sieve which will retain all the product and still allow the insects and mites to pass through.
When live larvae and mites are to be extracted from powdered products such as flour or cocoa powders, one of the following techniques may be used:
- Plate Method -- Modify the Berlese funnel by placing a porcelain or metal plate on a coarse sieve. Spread the powdered product thinly over this plate. Gradually heat the plate, starting at the center and moving the heat outward, until the insects and mites have fallen off the edge and are collected below as in the basic procedure.
- Chip Method -- Modify the funnel by spreading porcelain or mica chips over the entire surface of the sieve. Spread the powdered product over these chips and then gradually heat from above. Collect the insects and mites as in the basic procedure.
- Multiple-Plate Method -- This method requires modification of the funnel by the insertion of a double helix step-like central core of flat metal plates. Pour the powdered product over the core, shake once to distribute evenly, and then gradually heat from above to drive the insects and mites downward. Collect as in the basic procedure.
REFERENCES
(1) "Cereals and Pulses - Method of Test for Infestation by X-ray Examination," INTERNATIONAL STANDARD, IS01162-1175(E), International Standards Organization, Geneva, Switzerland.
(2) Nicholson, J.F., "An evaluation of five procedures for determination of internal insect infestation in wheat with X-rays," JAOAC 36: 150, 1953.
(3) "AACC Method 28-21, X-ray Examination for Internal Insect Infestation," AACC Approved Methods, American Association of Cereal Chemists, 1983.
(4) Tuite, J., Plant Pathological Methods - Fungi and Bacteria, Burgess Publishing Co., Minneapolis, MN, 1969.
(5) Brickey, P.M., Jr., J.S. Gecan, and A. Rothschild, "Method for determining direction of insect boring through food packaging materials," JAOAC, 56: 640-642, 1973.
(6) Barnett, H.L., Illustrated Genera of Imperfect Fungi, 2nd Ed., Burgess Publishing Co., Minneapolis, MN, 1960.